Import Images
The import process follows three simple steps:
- Select Folder Location.
- Select Series for Import.
- Selected Series is loaded onto the Viewer.
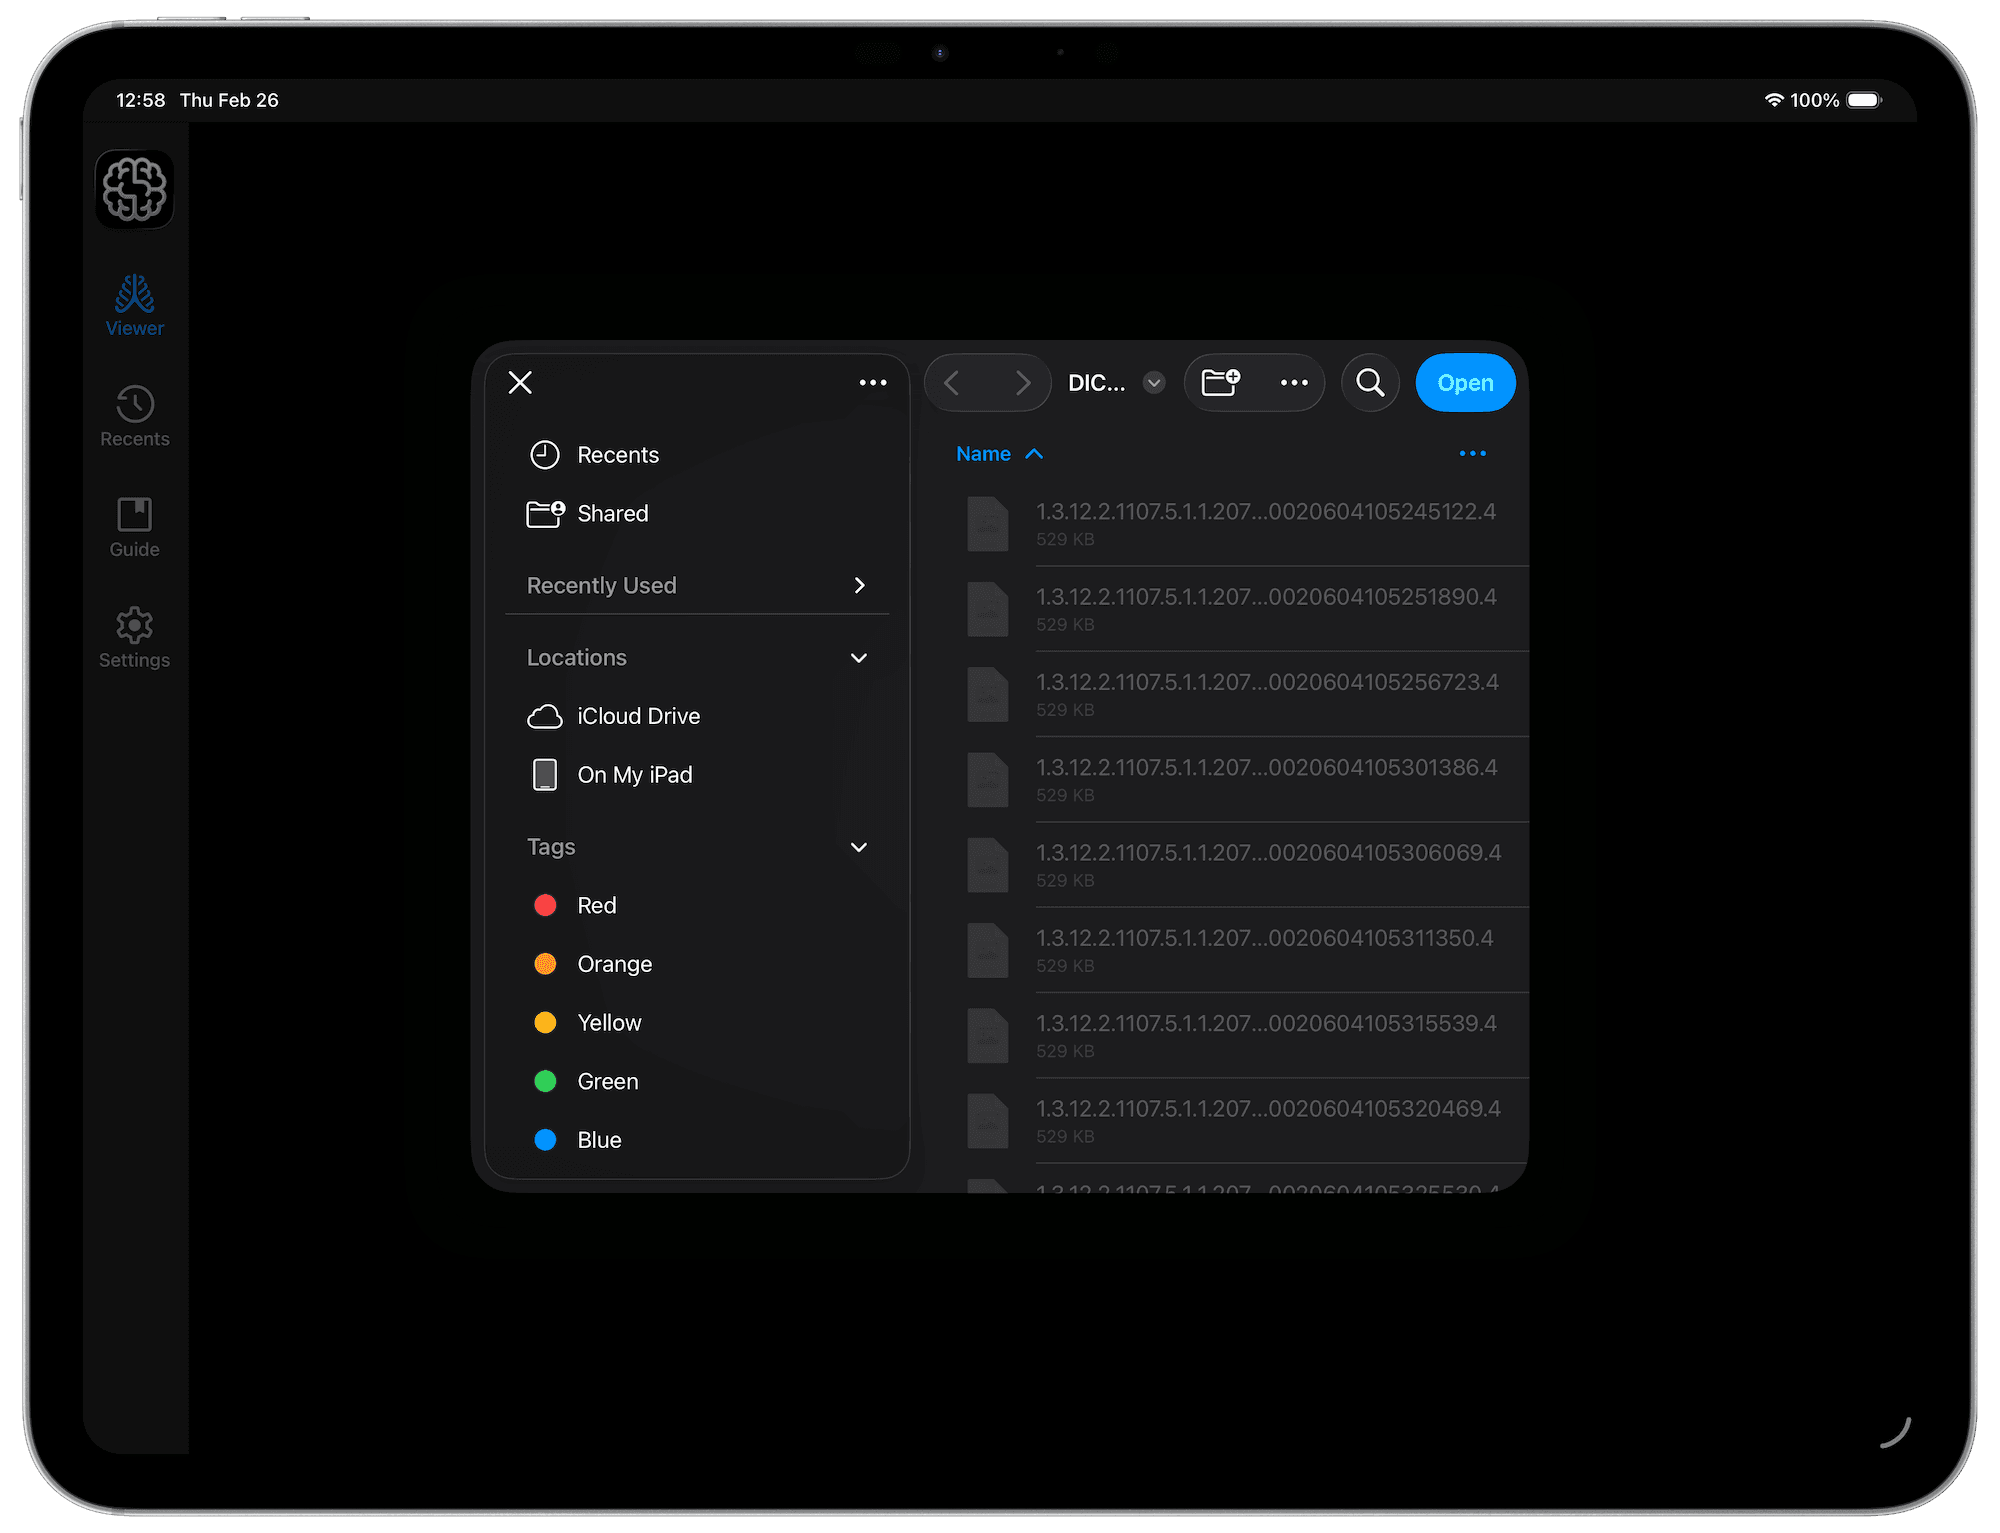
First, with the Viewer Tab active, select the 'Plus' button at the center of the screen. A dialog will open, from which you can select the folder containing DICOM images to import. Once selected, DICOM Vision Go will scan for DICOM files up to 5 subdirectories deep, allowing you to select a parent folder and pick the DICOM Series you are after from the resulting previews.
Next, DICOM Vision Go will group all Images in the selected folder into their respective series, and give you a preview of each, as illustrated in the example below. The table includes a summary of each series including a preview image, patient name, study description, series description, number of images and modality. Pick the row containing the series you wish to import, and tap the blue tick at the top-right to import.
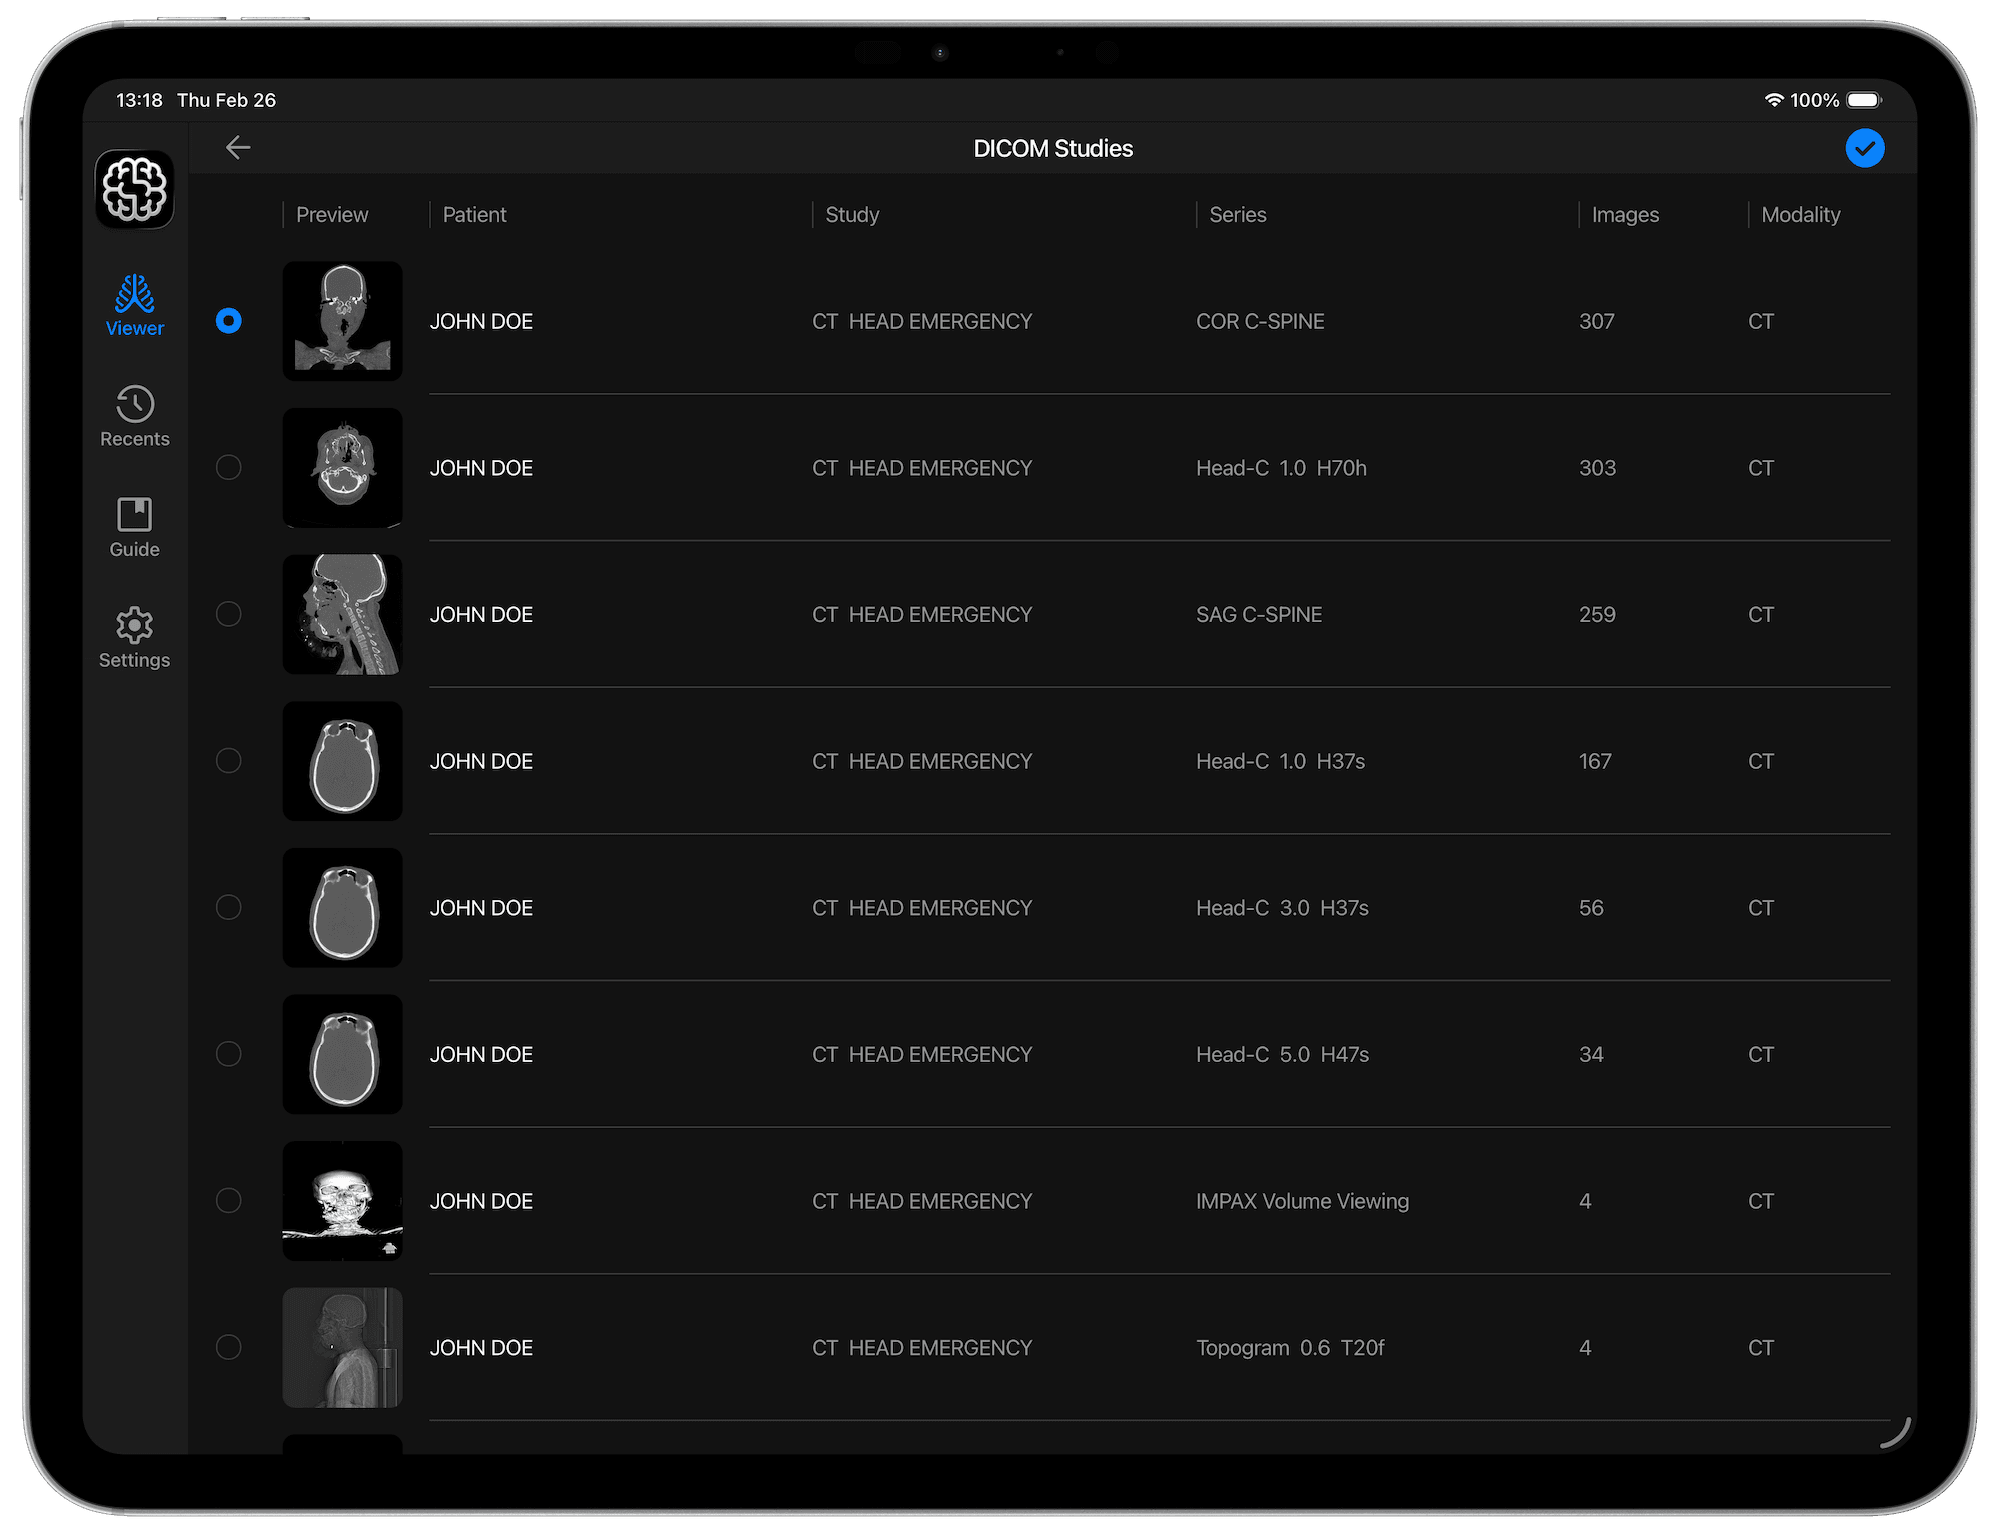
Note that if only one series is detected in the folder you select, this step above will be skipped.
Slices in the original orientation will be loaded onto the Viewer in grayscale. Drag the slider on the right (or bottom if your device is in Portrait view), either up or down, to scroll through all slices in the series. Use the Axial, Sagittal and Coronal buttons in the toolbar to switch between orientations.

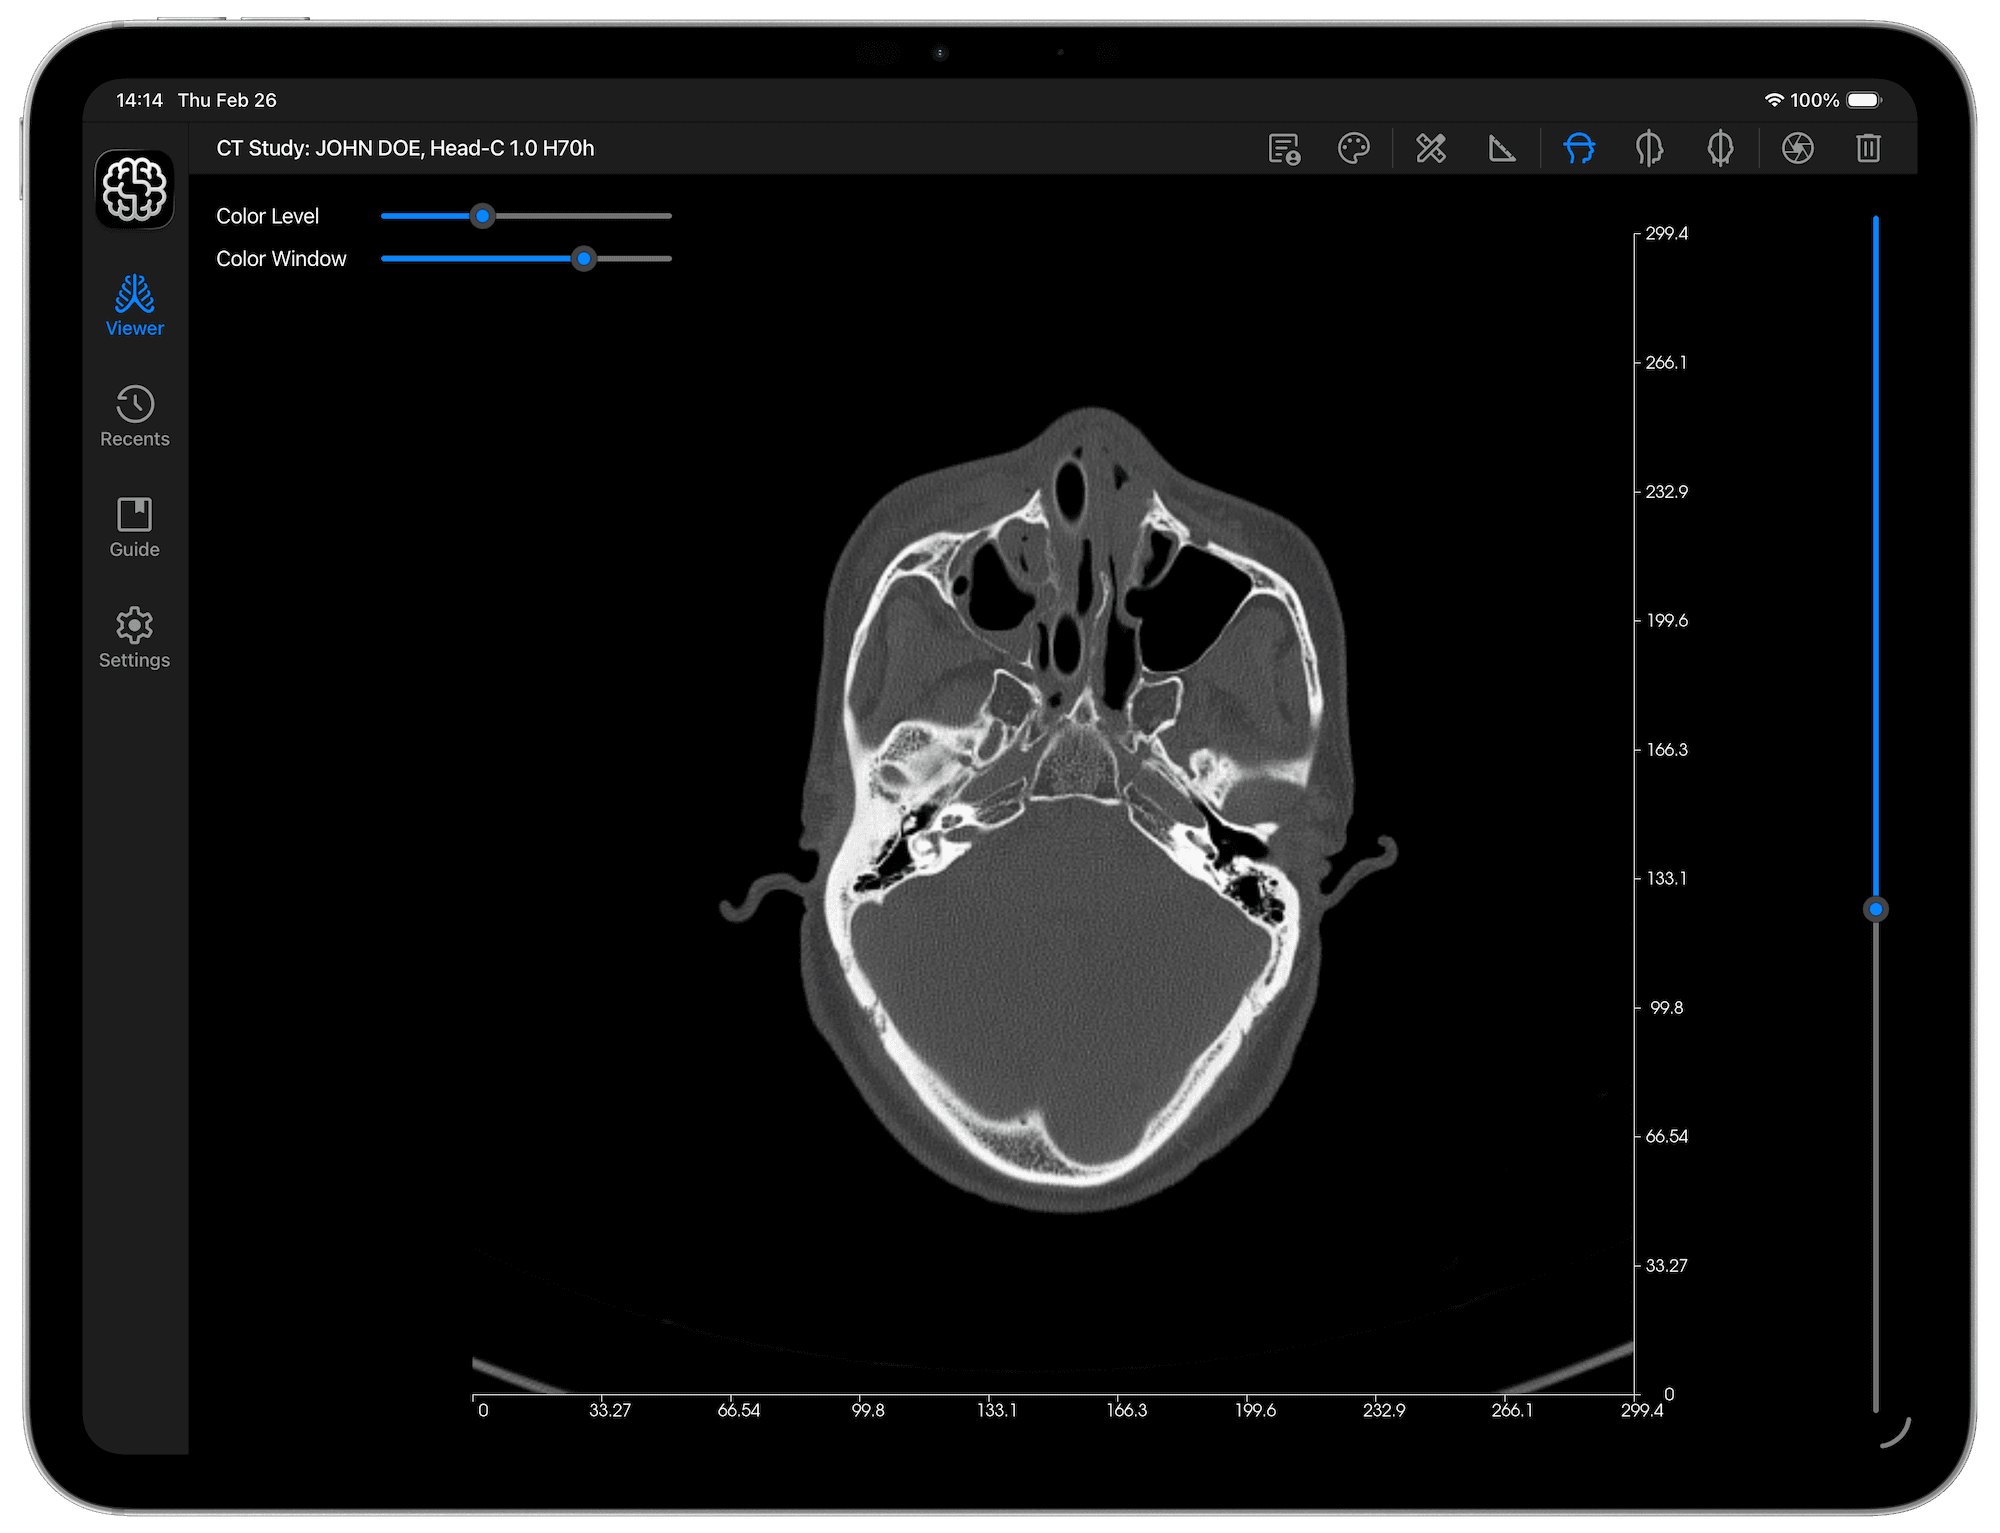
X & Y axes, featuring 10 equally spaced points, are added onto the length and width of each slice. Each point includes the distance from the origin. These axes are added by default, however you can hide them if you wish, from the settings tab by toggling the 'X & Y Axes' switch. Your preference will be saved.
The canvas where the image is displayed accepts pinch touch gestures, to pan or zoom in and out of your images. Refer to the Interaction section if you need clarification on how to do this.
Finally, an extensive list of DICOM Tags read from the imported images, is put together, and displayed in a table found in a 'DICOM Tags' tab accessible in the Viewer.
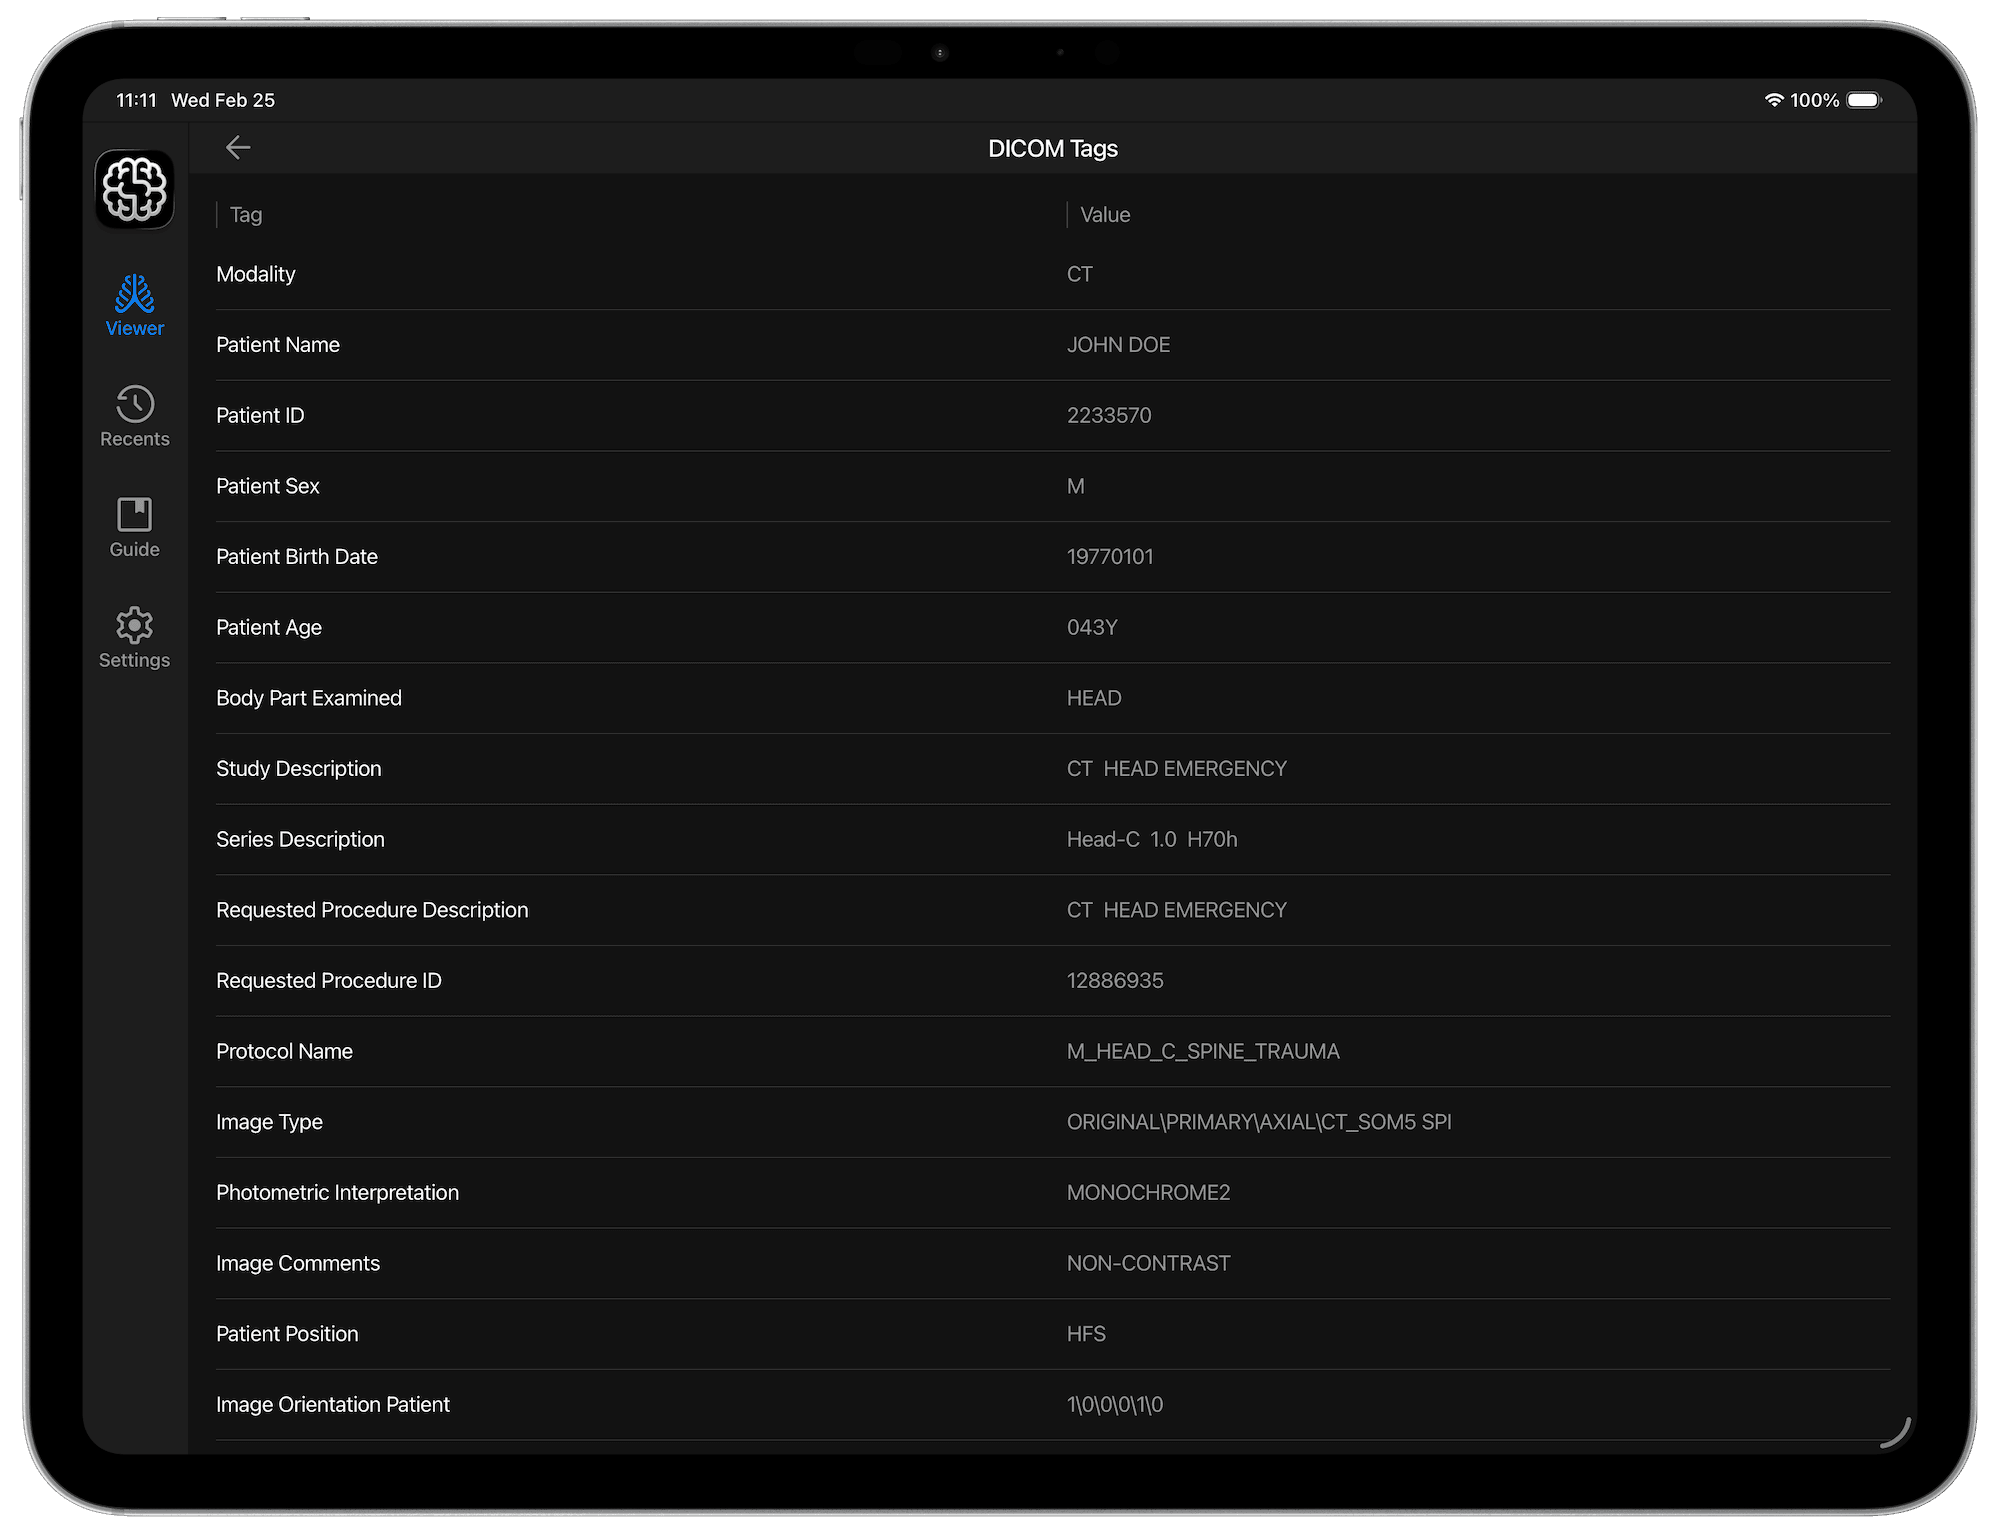

Tap the 'DICOM Tags' button with the icon above, in the toolbar to view the DICOM Tags. Scroll up and down to see the entire table. Tap the 'Back' button (top-left) to return to the Image View.
Apply Colormaps
In DICOM Vision Go, you can apply distinct colormaps to your images, to enhance your view of the intricate details in each slice. The colormaps come in two sets:
- Perceptually Uniform Colormaps.
- DICOM Standard Color Palettes.
The primary feature of the Perceptually Uniform Colormaps is that when applied, equal steps in data are perceived as equal steps in the color space. These colormaps are frequently used in scientific study, and may be easily recognizable, with common examples including Jet, Hot, Bone and Plasma.
The DICOM Standard Color Palettes are defined in the DICOM Standard. They include:
- Hot Iron: The Hot Iron color palette is often used in nuclear medicine applications to make differences in signal intensity (counts) more apparent to the human observer.
- PET: The PET color palette is often used in PET applications to pseudo-color the superimposed PET images when displayed fused with underlying CT images.
- Hot Metal Blue: The Hot Metal Blue colour palette is often used in nuclear medicine or PET applications to make differences in signal intensity (counts) more apparent to the human observer.
- PET 20 Step: The PET 20 Step colour palette is often used in PET applications to make differences in signal intensity (counts) more apparent to the human observer.
- Spring, Summer, Fall & Winter: These Colour Palettes are suggested for use in colour fMRI activation maps. They shade from one pastel colour to another which is distinctly different, making them suitable for illustrating either unipolar or bipolar activation. They convey activation strength within one statistical parametric map, while making it possible for the human observer to distinguish between different fMRI activation maps in the same blended display.
Learn more about them here.
Colormap Application
Tab the Colormap button in the Viewer toolbar, and a menu will open with all available colormaps. Grayscale is active by default. Once you have images loaded into the Viewer, open the menu, and pick a colormap. It will be applied instantly.
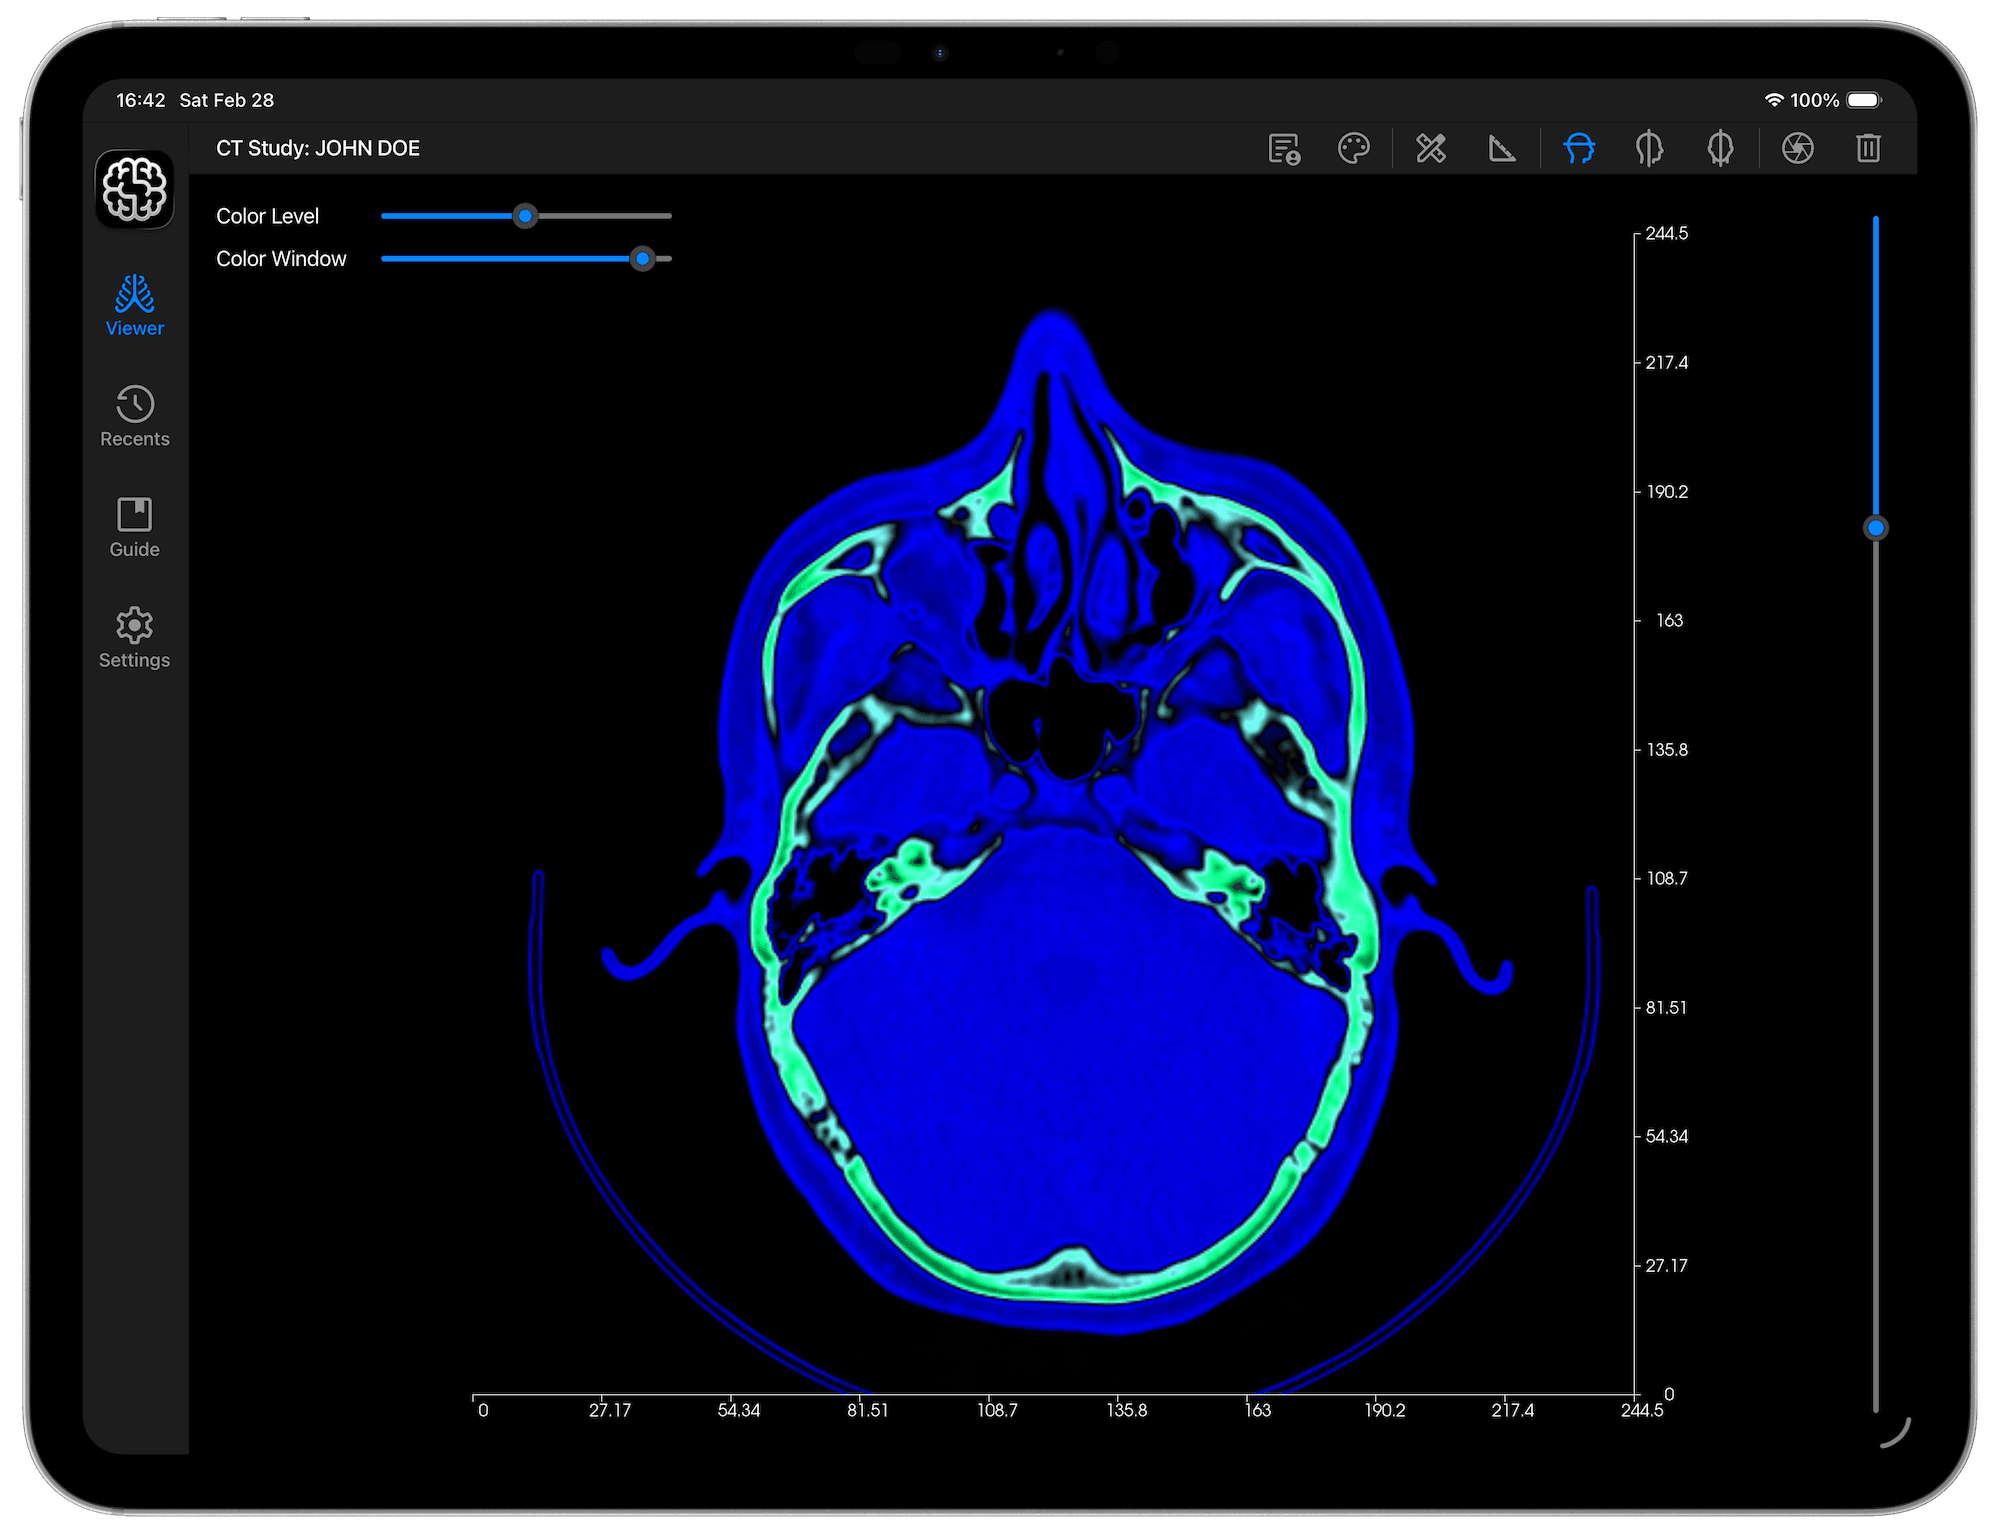

Color Level & Color Window
In the visualization of DICOM images, color level and color window are critical attributes that control how pixel intensity values are mapped to visible brightness and contrast on a display. These settings significantly influence the final appearance of medical images.
Color Level (Window Center)
This parameter defines the midpoint of the range of pixel intensity values that will be displayed. It determines the brightness of the image. For example, if the level is set to a lower value, darker areas of the image become more prominent, while higher values emphasize brighter regions.
Color Window (Window Width)
The window width specifies the range of pixel intensity values around the center that will be mapped to the visible grayscale or color spectrum. A narrow window width increases contrast by focusing on a smaller range of pixel intensities, making subtle differences in intensity more noticeable. Conversely, a wider window width reduces contrast by encompassing a broader range of intensities.
Impact on Contrast and Brightness
Narrowing the window width enhances contrast, which is useful for identifying fine details like small lesions or nodules.
Changing the level can shift focus between darker and lighter regions, aiding in specific diagnostic tasks.
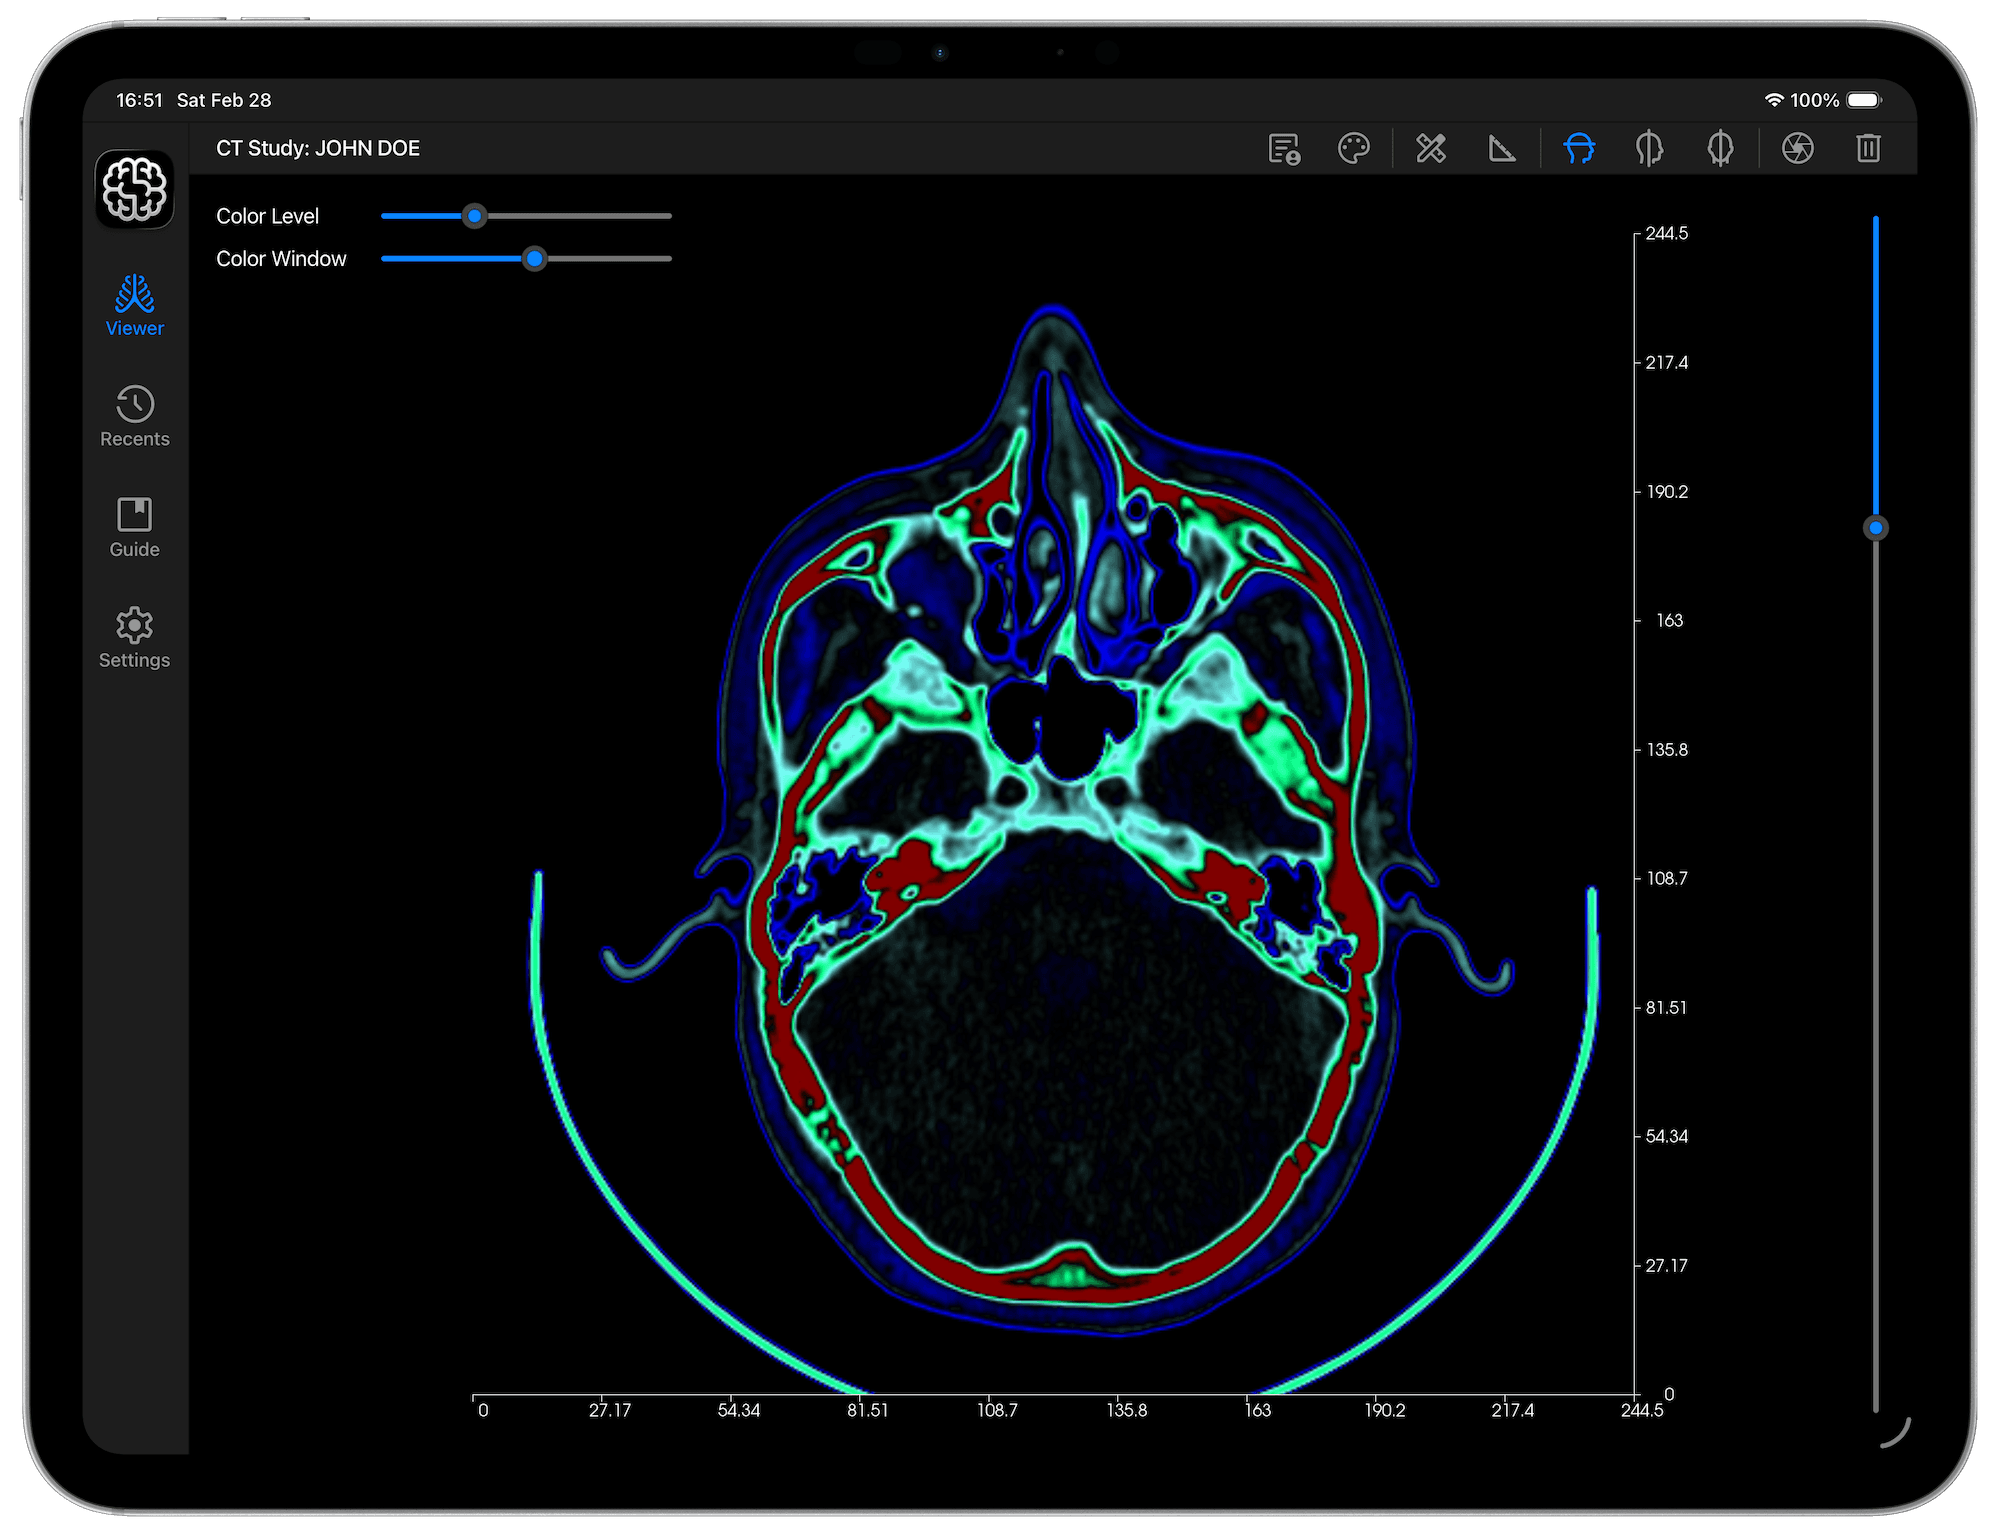
Take the example above, the Color Level has been lowered, and the Color Window narrowed. Compare this with the previous image earlier in this section. This is the same image. Adjusting the color level and window width directly affects how details in the image are perceived.
Use the Color Level and Color Window sliders found to the top-left of the Viewer, to further customize your image visualization, and enhance diagnostic accuracy. These sliders are shown by default, however, if you don't want to use them you can hide them from the from the settings tab, by toggling the 'Color Level & Color Window' switch. Your preference will be saved.
Black Colormap Base
This tool applies to colormaps whose initial color isn't black. To enhance contrast in your image, you may want to alter the colormap, and set the base color to black. Take the images below as an example. The image to the left shows a DICOM image with the 'Gist_ncar reversed' colormap applied. To the right is the same image, with the initial color changed to black.


Activate the application of a Black Background to all your colormaps from the settings tab, by toggling the 'Black Colormap Base' switch. Your preference will be saved
Measure Tools
Physicians and radiologists commonly measure specific tissues, organs, and anatomical structures to aid in diagnosis and treatment planning. Common clinical applications include:
- Tumor Monitoring: Measuring tumor size changes over time to assess treatment response.
- Orthopaedic Analysis: Measuring bone alignment angles for surgical planning.
- Opthalmology: Assessing macular grid thickness for retinal diseases.
DICOM Vision Go provides tools for measuring distances and angles between selected points. Learn how to use each of these below.
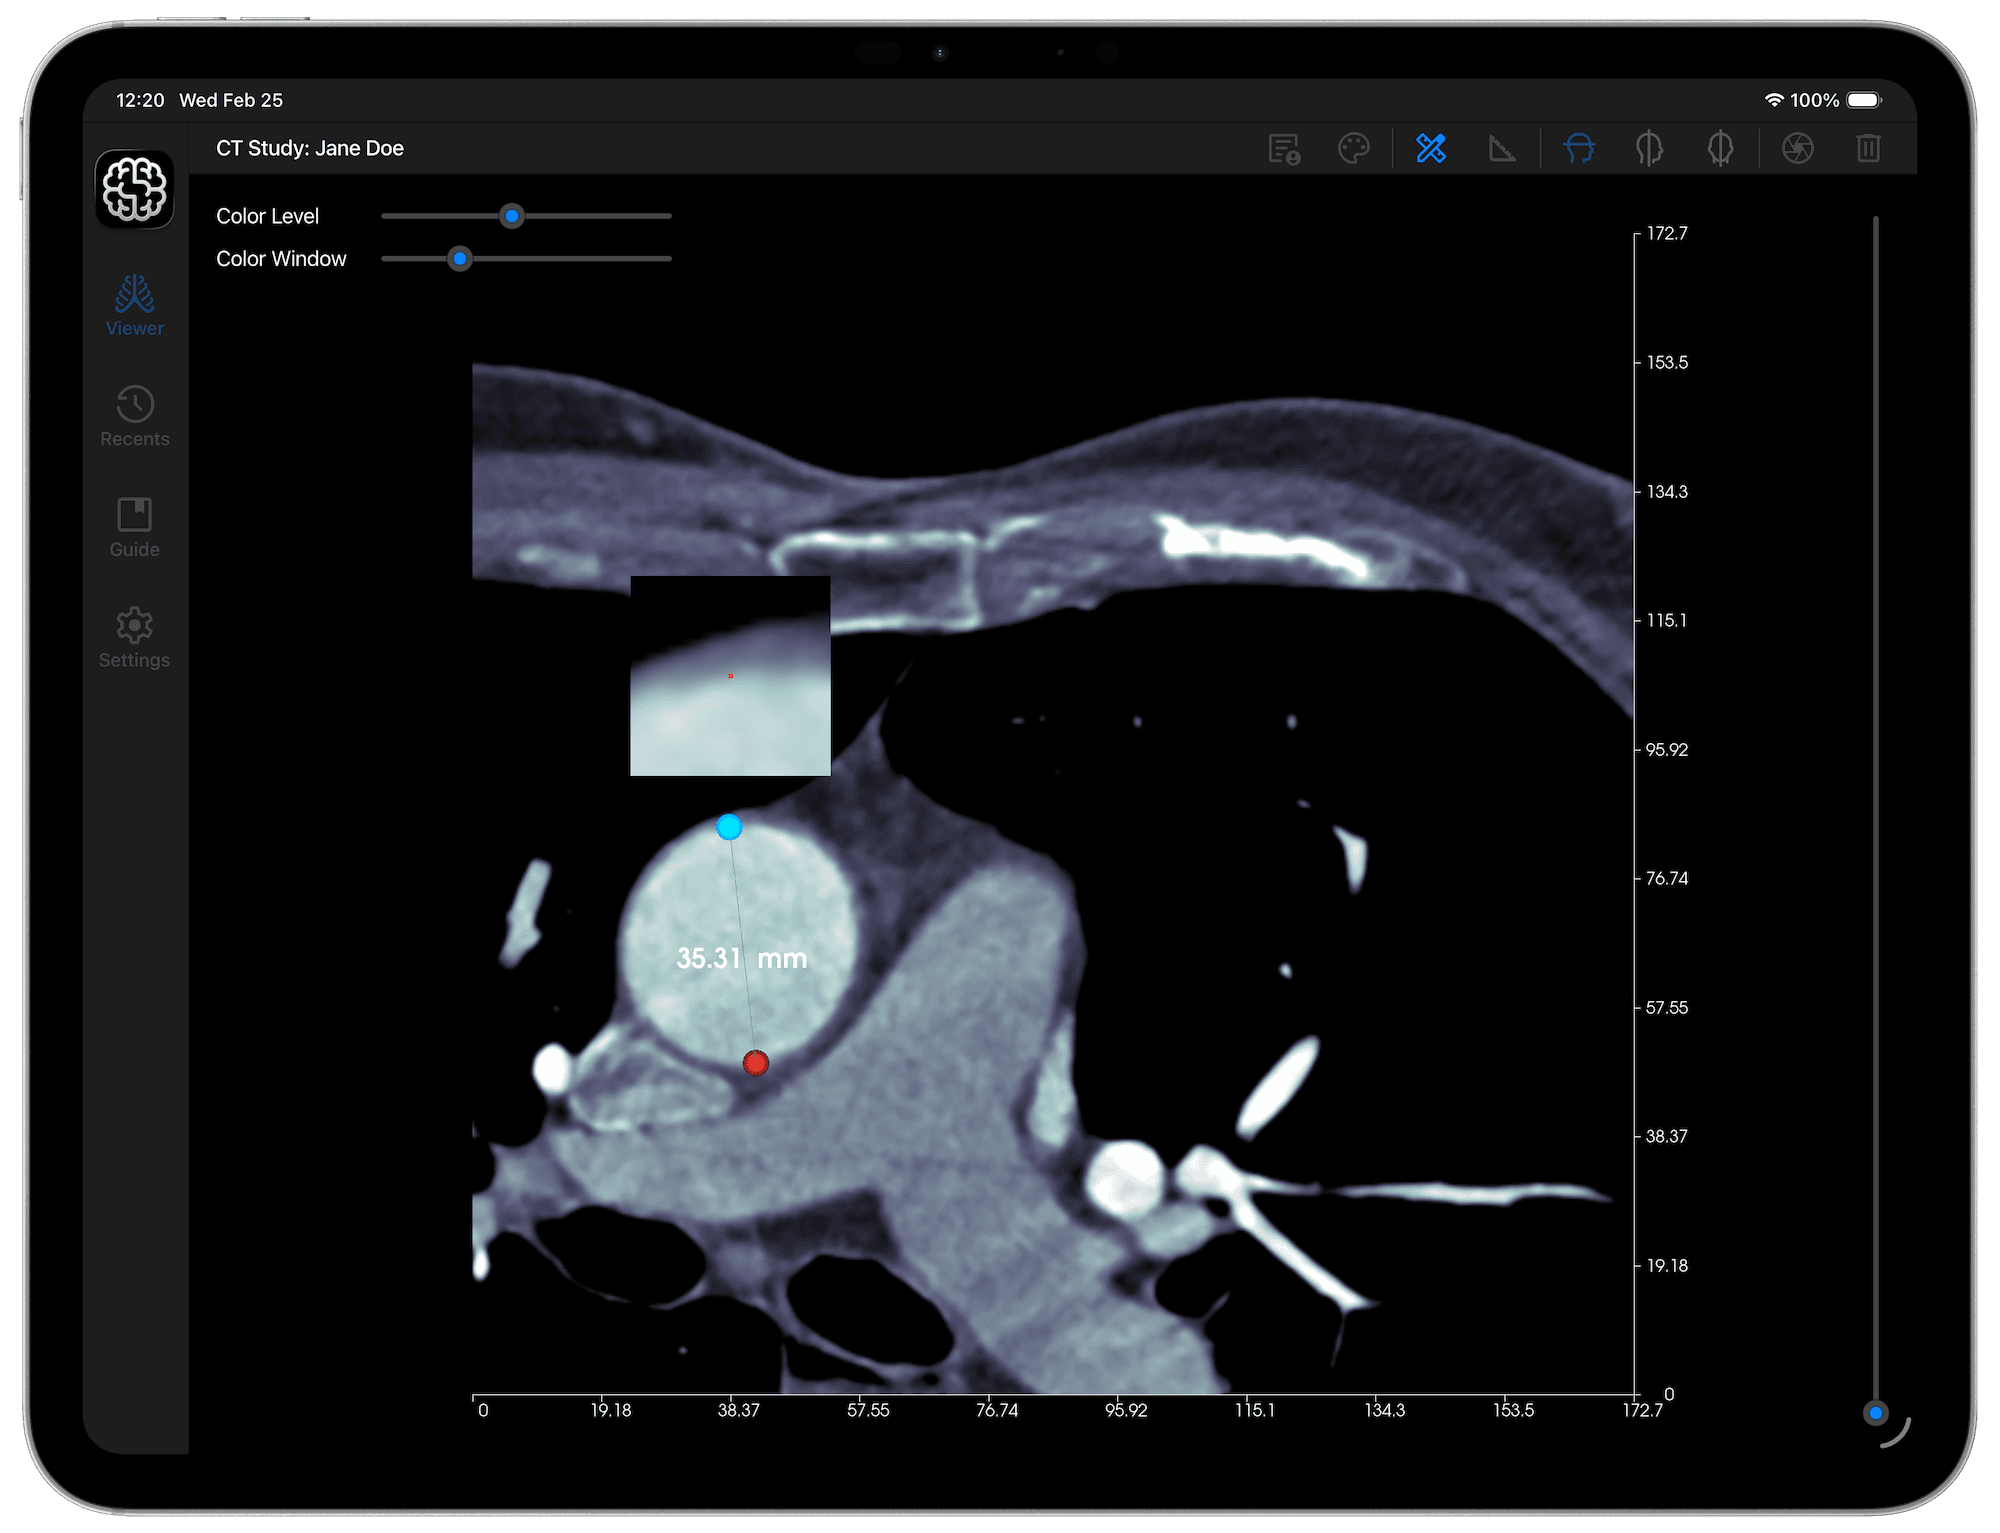
Distance Tool
This tool works as follows:
- Tap the 'Distance Tool' button in the Viewer toolbar.
- Tap on the image where you intend the initial point of the measurement to be placed. A red handle will be placed there.
- Place a second point on the image, marking the distance you want measured.
- Once both points are placed, you can drag either handle to refine your measurement. A magnifier will appear above the handle that you drag, giving you a more precise view of where the point is.
When you are done, tap the 'Distance Tool' button once again, to deactivate this tool.

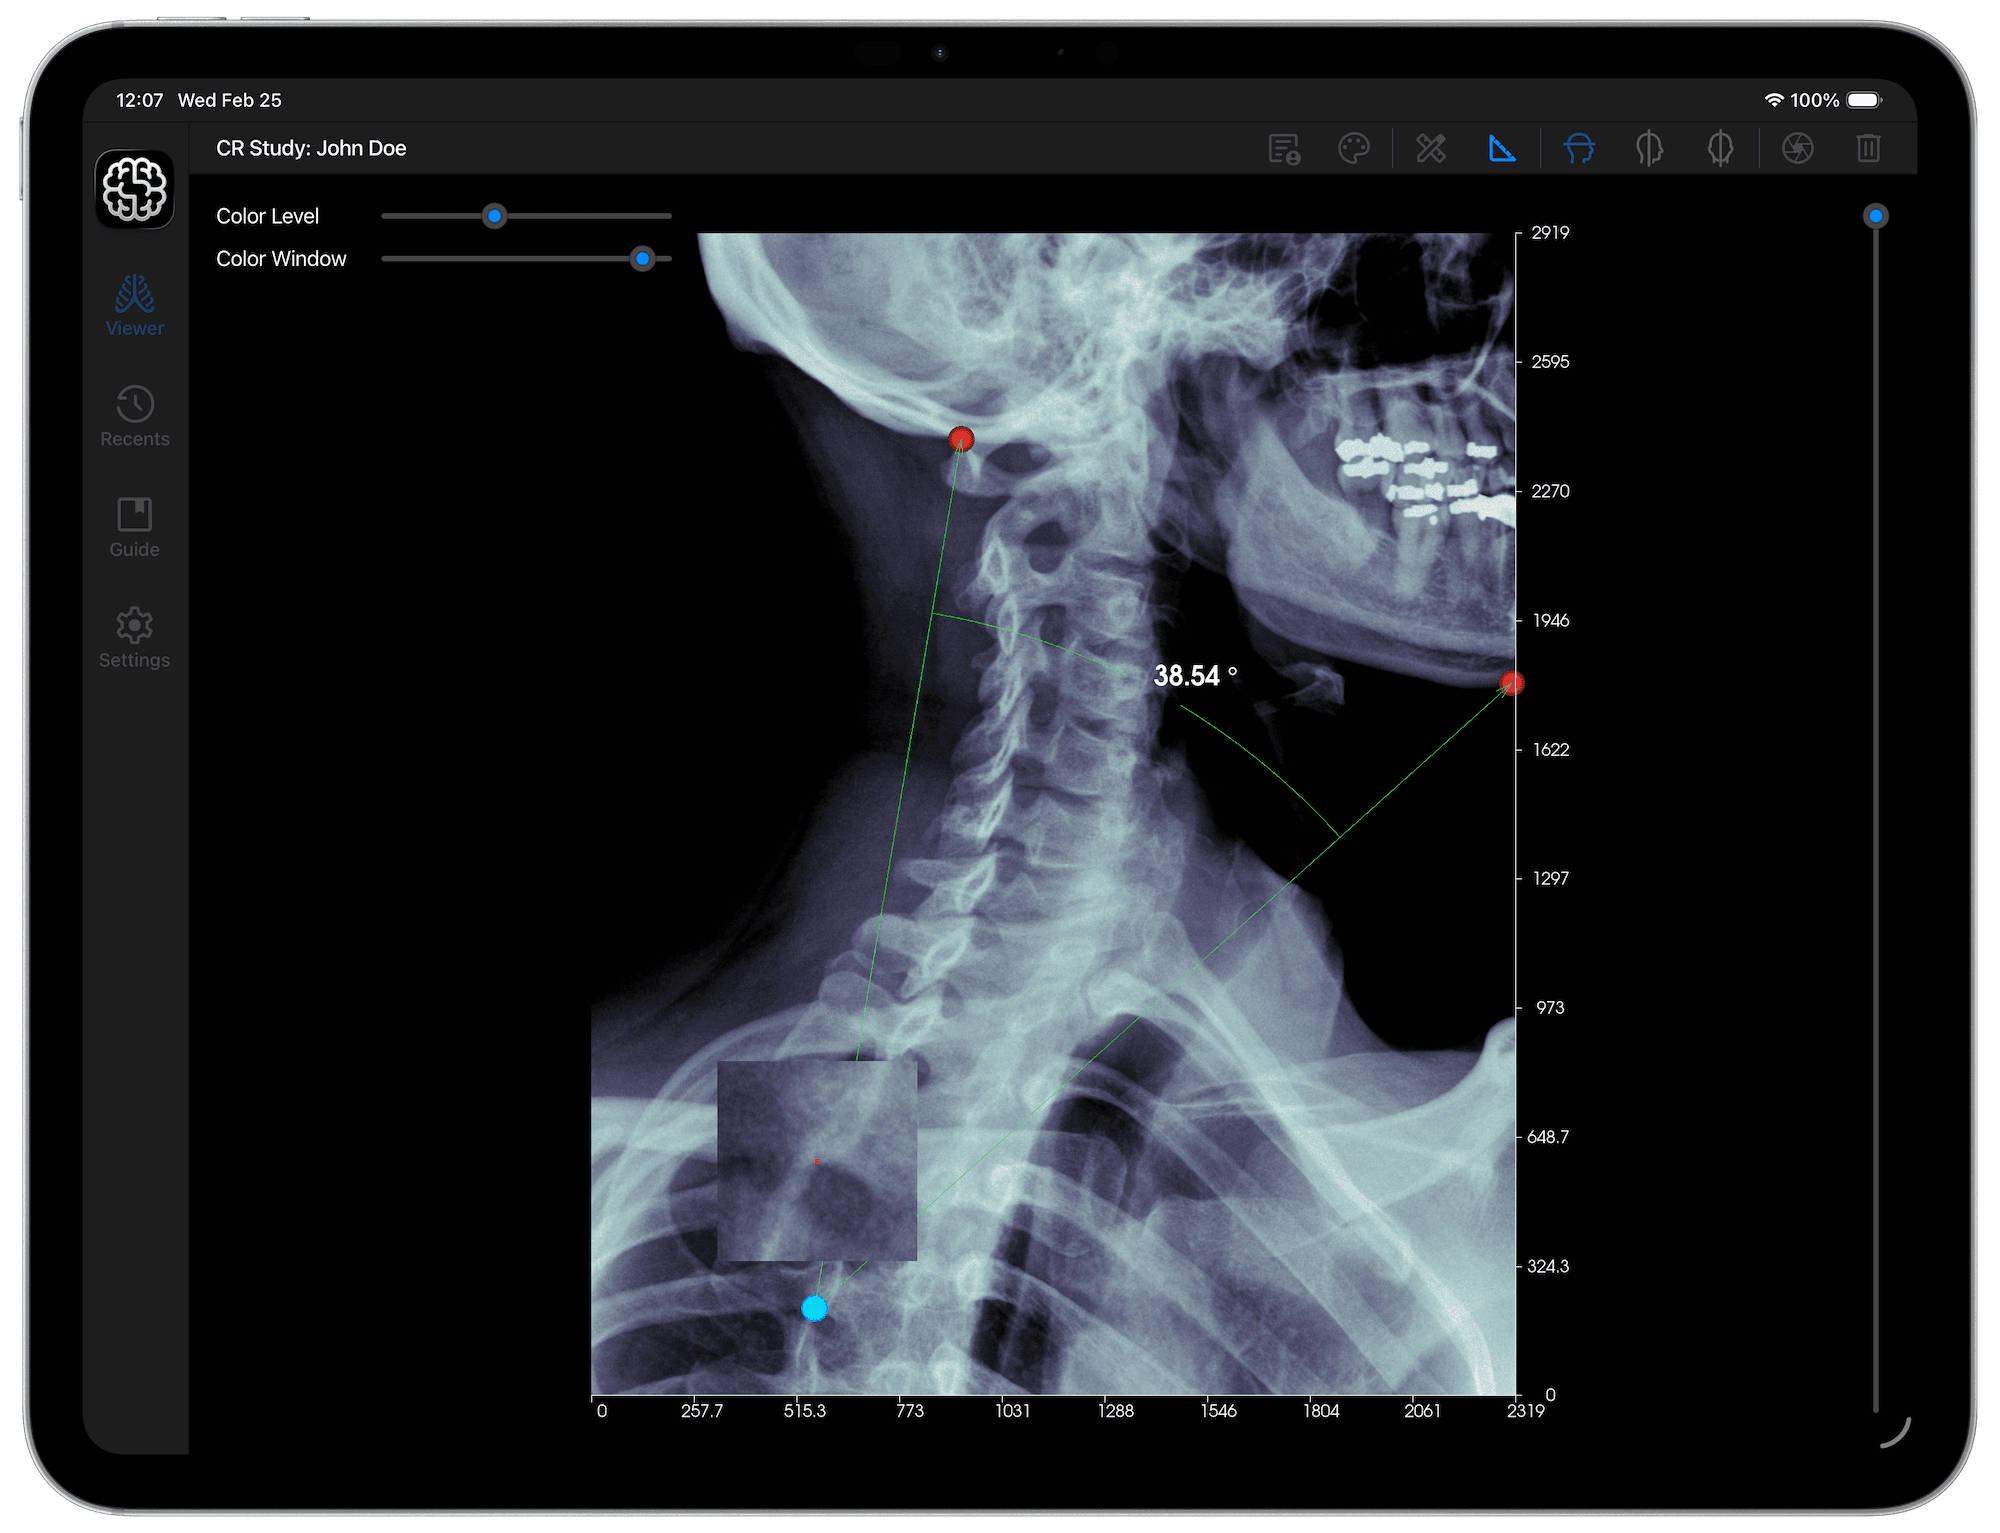
Angle Tool
This tool works by calculating the angle between three points that you place on an image. The second point acts as the vertex, with the first and third acting as the arms of the angle. Follow the steps below to create an angle measurement:
- Tap the 'Angle Tool' button in the Viewer toolbar.
- Tap on the image where you intend the initial point of the angle measurement to be placed. A red handle will be placed there.
- Repeat this process two more times to create the initial side, vertex and terminal side of the angle.
- Once complete, the angle between the three points will be displayed.
- You can drag any of the three handles to refine your measurement. A magnifier will appear above the handle that you drag, giving you a more precise view of where the point is.
When you are done, tap the 'Angle Tool' button once again to deactivate this tool.

Capture and Share Screenshots
You can capture a screenshot by tapping the 'Camera' button in the toolbar. Once activated, DICOM Vision Go will quickly capture an image of the canvas in the Viewer, and present you with your device's share sheet. From here, you can pick any application on your device that you want to use to either save the image, or send it to someone else. The image is captured in PNG Format, and is stripped of any widgets visible on screen.


The only condition for a successful screenshot is that the Viewer is not empty.
Gestures
In DICOM Vision Go, you can use different touch gestures to achieve different things: tap to activate a tool, touch and drag to pan an image, and pinch to zoom in or out of an image.
Tap
Using one finger, quickly and firmly touch the screen, then lift your finger. Use this gesture to choose tools, activate features, or toggle settings on or off.

Touch and Drag
Place two fingers firmly on the screen, and drag in any direction. Once you have images loaded in the Viewer, use this gesture to pan the image slice in view in any direction.
Pinch
Once you have images loaded in the Viewer, place two fingers on the screen and spread them apart to zoom in on a specific part of an image. Pinch your fingers bringing them together to zoom out.

In-App Purchases
DICOM Vision Go currently has a single license plan:
- Core: This unlocks access to the application indefinitely. This is a lifetime license, purchased for a one-time fee.
App Store
On iPhone and iPad, all purchases go through the App Store, and are tied to your Apple account. This means that any purchase you make will be available on all your Apple devices.
DICOM Vision Go offers a 7-Day free trial with all features enabled. At the end of the free trial, continued access will require a purchase of the Core license. You can check when your free trial is due to expire from the Settings tab: Settings → License. Here, you will see the exact date when your free trial expires, and an option to purchase the Core license. The expiry date is in UTC time. As DICOM Vision Go doesn't track your location, you will have to convert this to your local time.
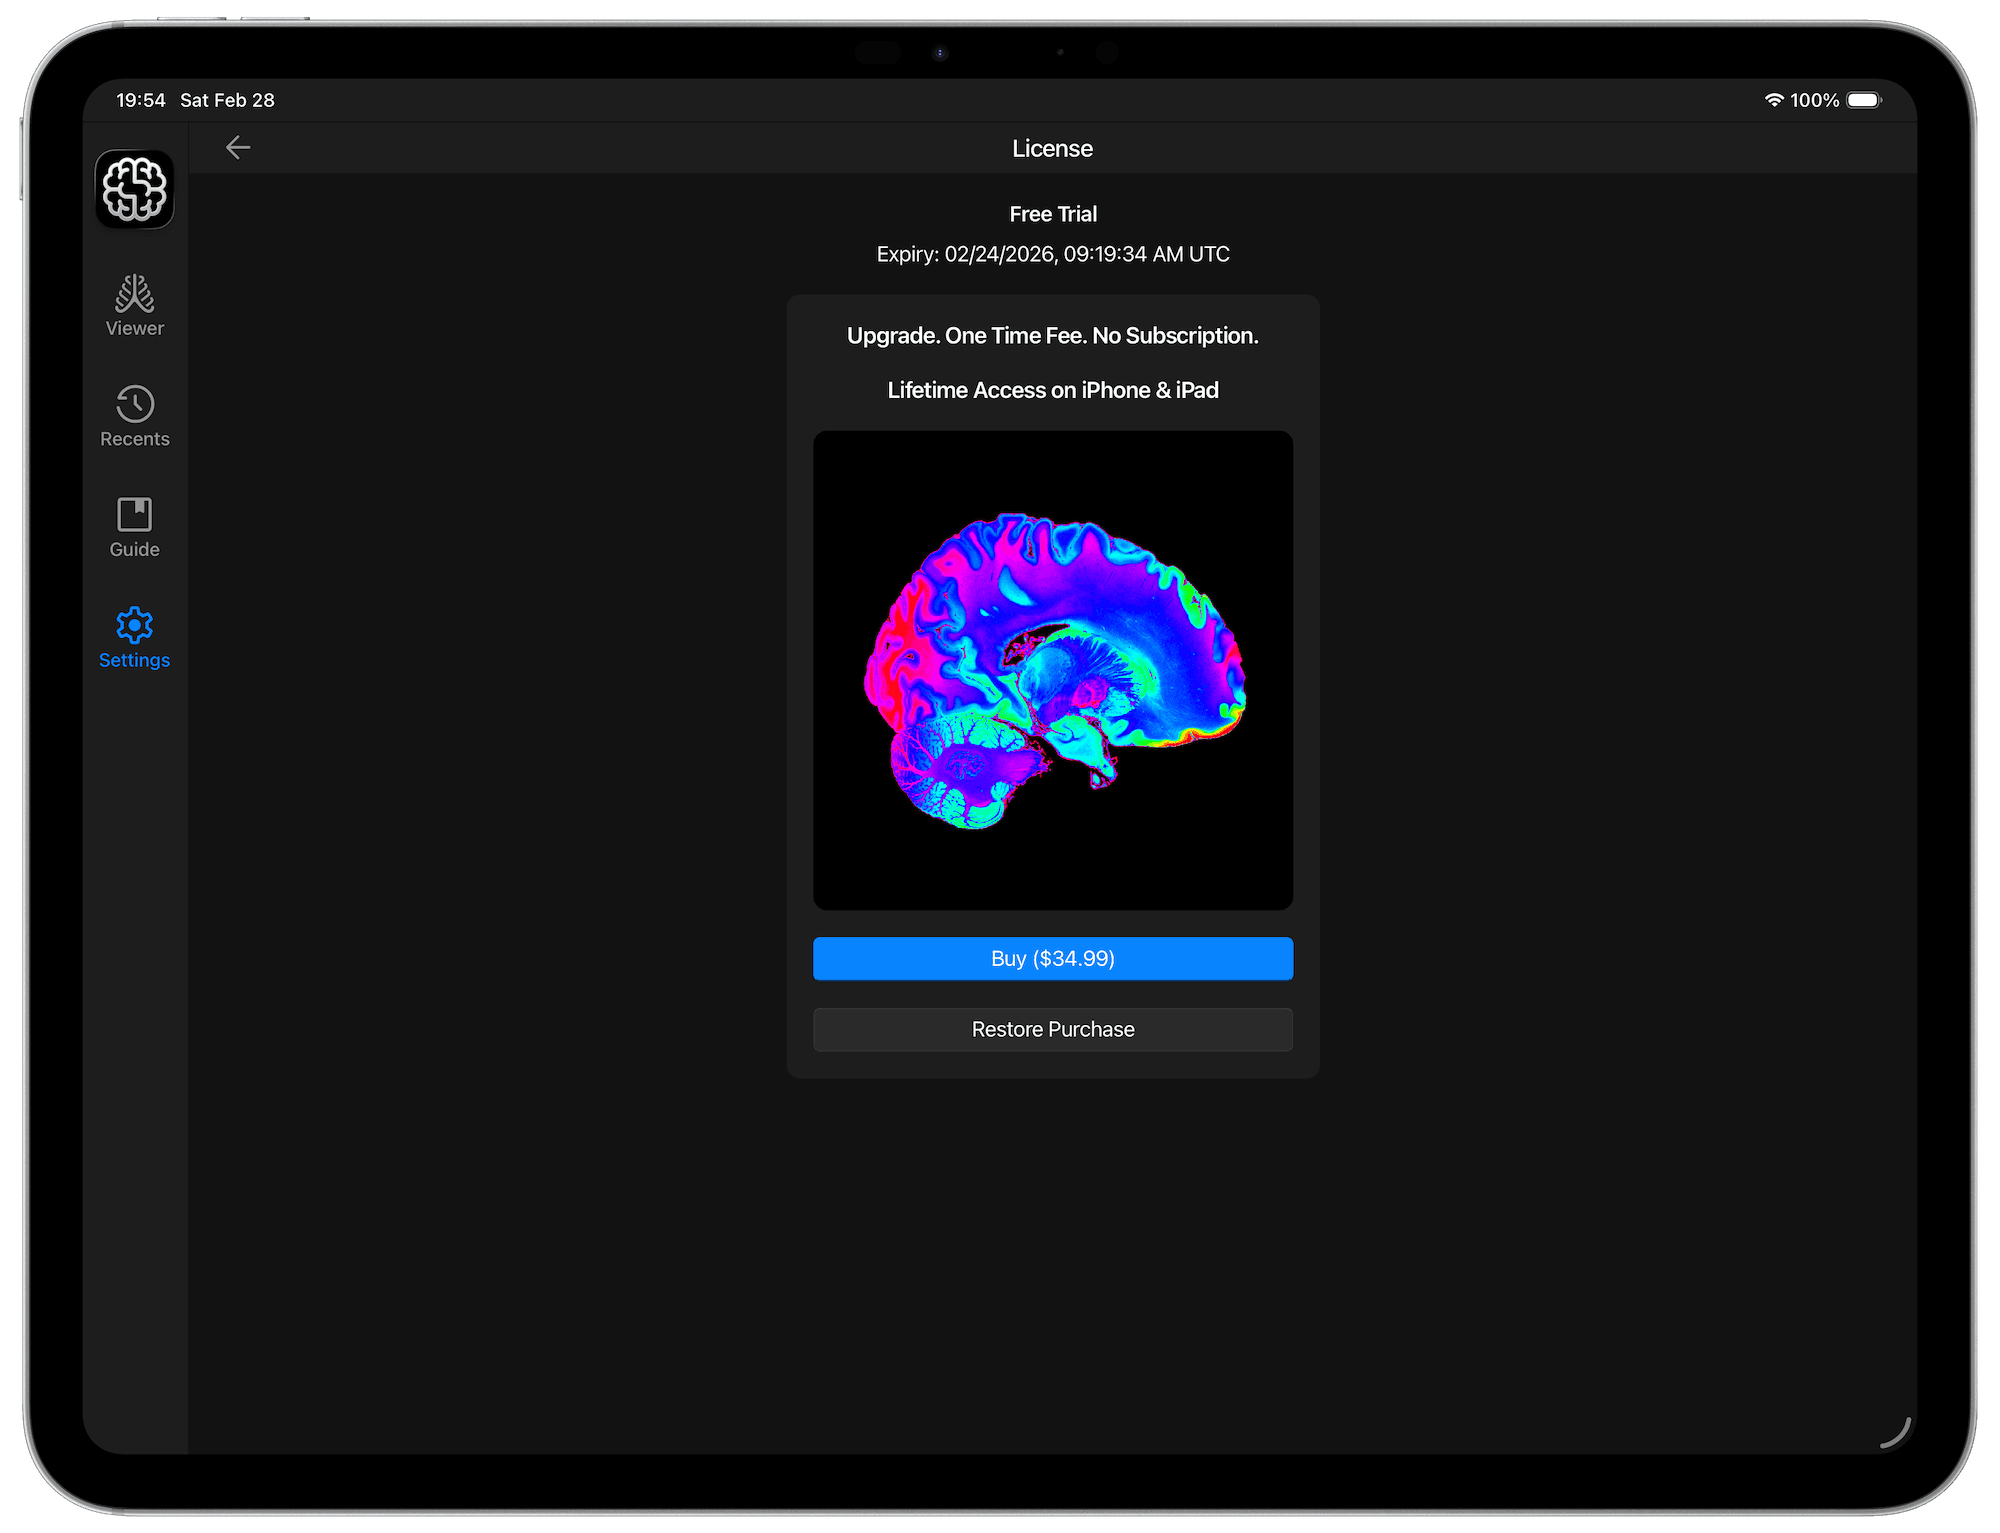
The currency and pricing of the Core license are retrieved from the App Store and will be localized to your country. Select 'Buy' and a purchase will be initiated through the App Store. If you install DICOM Vision Go on a new device, and had made a purchase from your previous device, click the 'Restore Purchase' button. All your previous purchases for DICOM Vision Go will be retrieved from the App Store. If the Core license is found, your purchase will be restored.